Contributing to an ORMIR project
In the ORMIR community, we host our projects on GitHub.
On this page, you will learn the workflow for contributing to a project, whether you want to improve the documentation, report a bug, or add new features to a Python package.
If you are a new contributor, don’t worry! This guide walks you through the entire process step by step, from setting up the project on your computer to opening your first pull request.
If you are an experienced contributor, you may also be interested in some of the best practices we follow, such as: Why do I need to fork the repository?, How may branches should I create?, and How often should I commit?. Also, if you think that your contribution requires a different workflow, please contact the project coordinators.
Before you start
If you are new to GitHub, you will need to:
Create a GitHub account
Install and log in into GitHub Desktop (if you prefer working with a graphical user interface) or Git (if you prefer working from the command line). Throughout this guide, you will find instructions for both options
If you already have GitHub and GitHub Desktop or Git, jump straight to the next section!
Getting ready
The first time you contribute to a project, you need to create a copy of it and download it to your computer. To do so, you need two steps:
1. Make the project your own - fork it
2. Bring the project to your computer — clone your fork
Let’s see what these mean and how to do it!
1. Make the project your own – fork it
Forking means creating a copy of someone else’s repository in your GitHub account
To fork a repository, go to the repository you want to contribute to on GitHub and click on Fork in the top-right corner of the page:

A new window will appear. If you want, you can customize the repository name. Then, click Create fork:
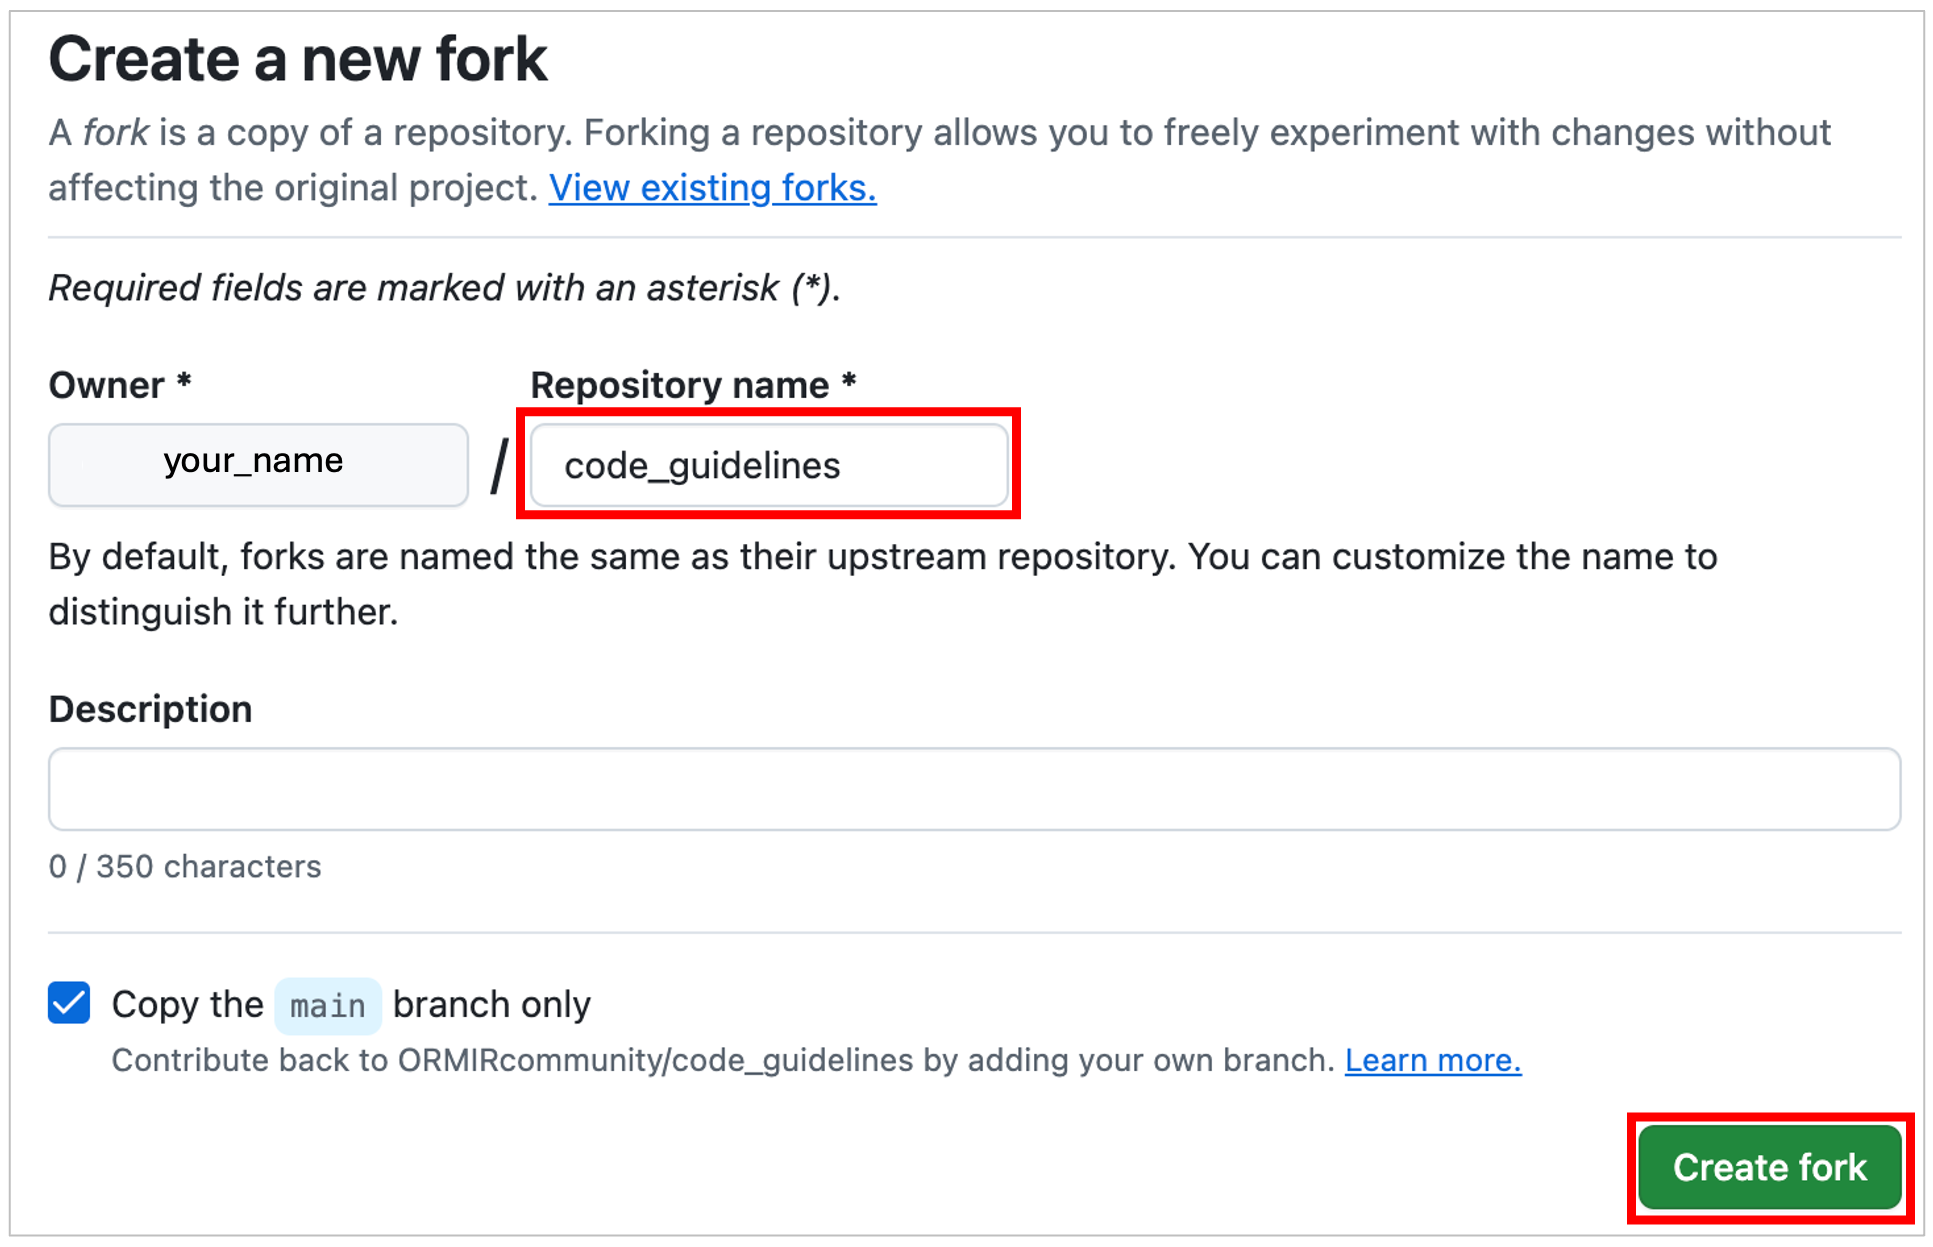
You will now see your fork – that is, a copy of the original repository – in your GitHub account.
2. Bring the project to your computer — clone your fork
Cloning means downloading a copy of a repository from GitHub to your computer
Here is how to clone the repository that you have just forked using GitHub Desktop (if you prefer working with a graphical user interface) or Git (if you prefer working from the command line):
In in the newly forked repository in your account, click the green button <> Code and then Open with GitHub Desktop:
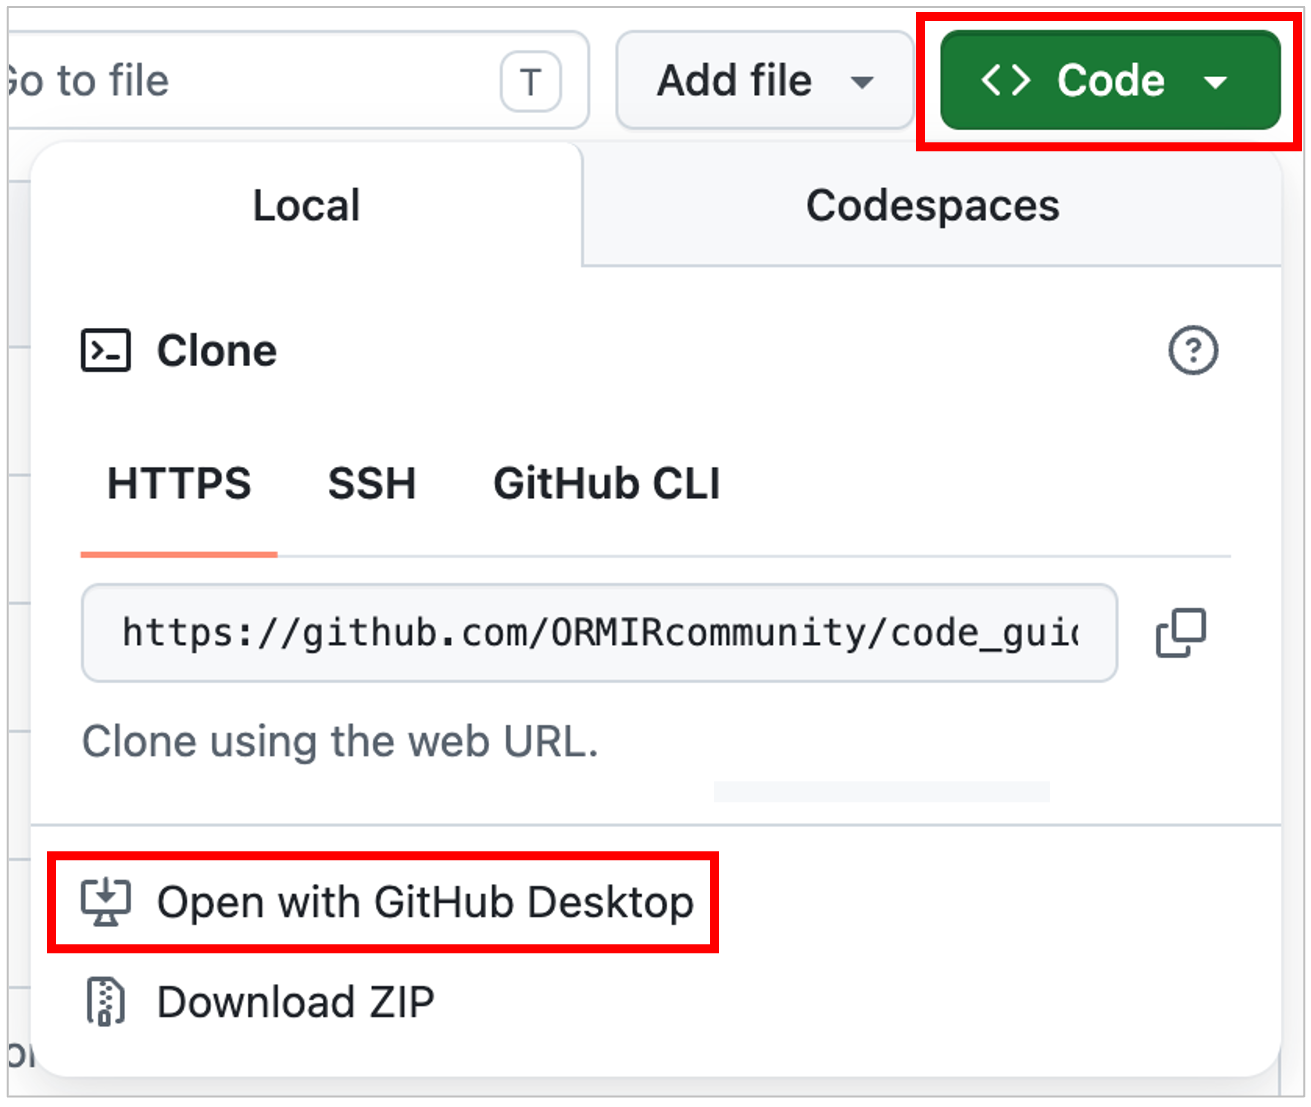
GitHub Desktop will launch and open a window similar to this one:
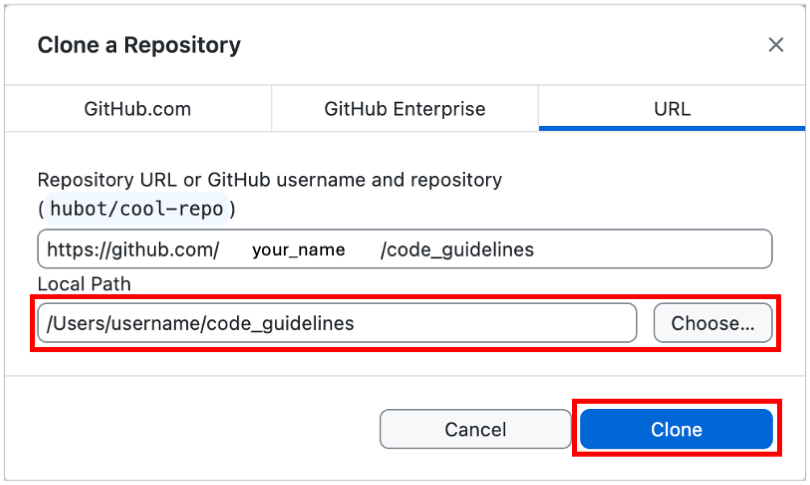
You will see two locations:
At the top, the repository’s location on GitHub.
At the bottom, the location where the repository will be downloaded on your computer. If you would like to change the download location, click
Chooseand select a different folder. When you are ready, clickCloneto download the repository to your computer.
Go to your forked repository on GitHub
Click the green
<> CodebuttonCopy the URL to clipboard
Open a terminal and run:
git clone https://github.com/your-username/project.git
cd project
where https://github.com/your-username/project.git is the URL you just copied and project is the local path of your project
Why do I need to fork the repository?
If you are contributing to a repository that you do not own or do not have write access to, you will typically fork and then clone it. This is considered good practice because forking creates your own copy of the project under your GitHub account, giving you a safe, independent workspace where you can freely make changes, experiment, and test ideas without affecting the original project. It also keeps the original repository clean and manageable — without forks, all contributors would create branches directly in it, quickly cluttering the repository with many unused branches (see what a branch is below). This also makes things easier for maintainers, who can focus on reviewing pull requests (see what a pull request is below) rather than managing other people’s branches.
On the other side, if you own the repository or have write access to it (that is, most likely you are one of the maintainers), you can usually clone it directly without creating a fork.
Contribute
It’s finally time to make the changes to the repository! To do so, there are five consecutive steps:
1. Setup the workspace — create a branch
2. Make your changes
3. Save your work — commit
4. Send it to your repository in GitHub — push to your fork
5. Propose your changes — open a pull request
It’s simpler than it looks. Let’s go step by step.
1. Setup the workspace — create a branch
A branch is a copy of the project dedicated to a specific contribution, topic, or fix
Before creating a new branch, you have to make sure that your fork is up to date with the original repository. This ensures that your branch starts from the latest version of the project and helps avoid merge conflicts later on. If this is your first contribution and you have just forked and cloned the repository, you can skip this step because your fork is already synchronized with the original repository and you can proceed directly to creating your branch.
Go to your fork on the GitHub website and click Sync fork:

# Make sure you are on the main branch
git checkout main

# Get the latest changes from the official repo (upstream)
git fetch upstream

# Merge upstream changes into your local main branch
git merge upstream/main

# Push the updated main branch to your fork (origin)
git push origin main
Let’s create a new branch!
Click Current branch in the top toolbar, then select New Branch:
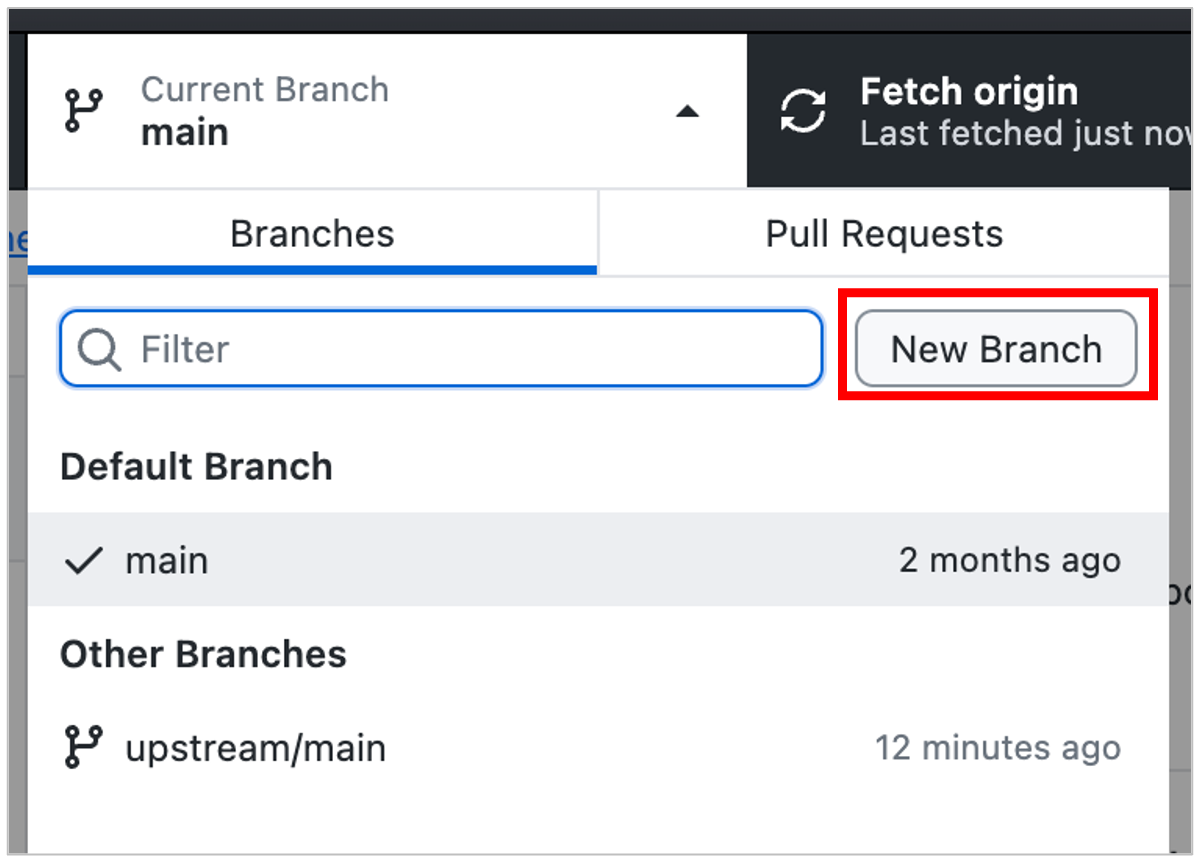
In the dialog that opens, enter a short, descriptive name for your branch that reflects the task you are working on. For example, add-contributing-guide or improve-unit-tests clearly indicate the purpose of the branch. Avoid generic names such as changes or branch1, which do not convey what the branch is intended for.
Click Create Branch:
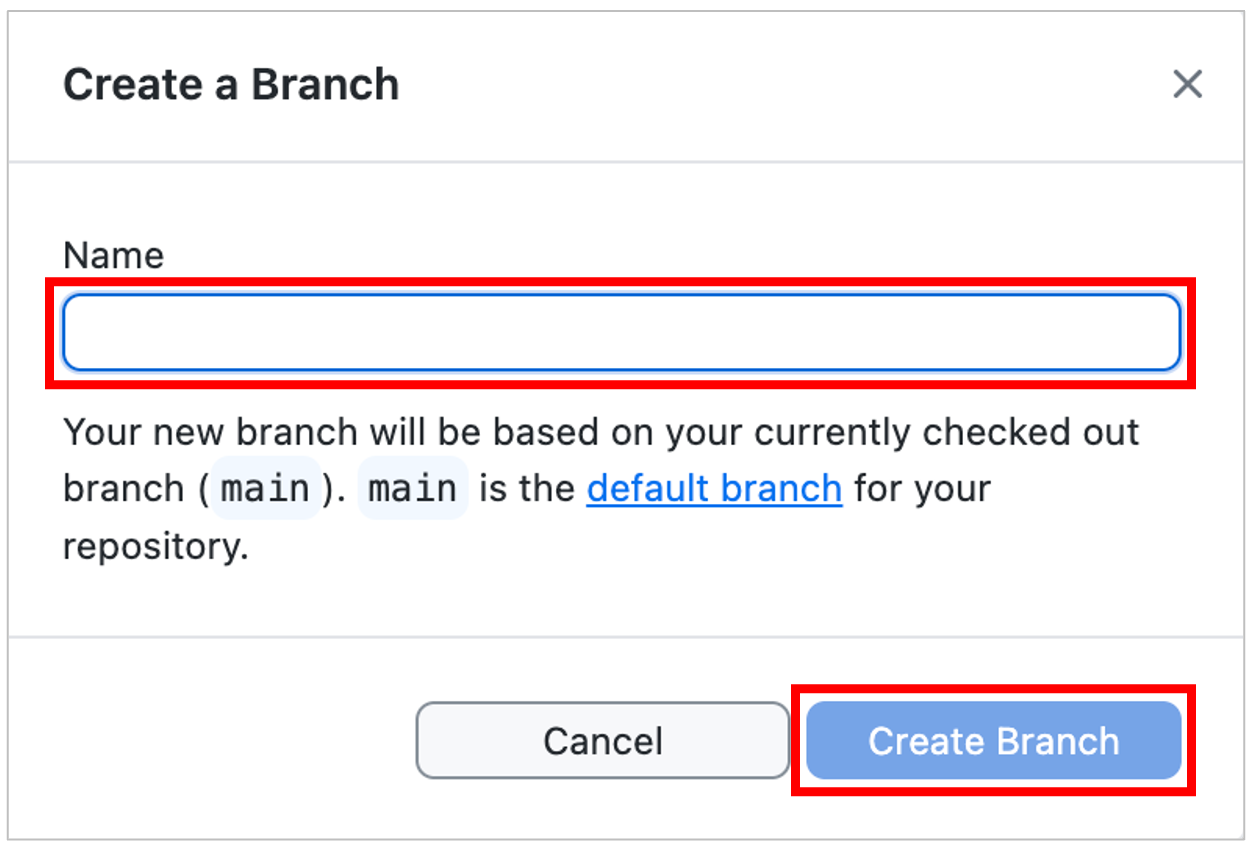
The name of the branch will appear under Current Branch in the top toolbar, indicating that it is now your active working branch.
# Create a new branch AND switch to it
git checkout -b my-branch-name
where my-branch-name is the name of the branch.
How may branches should I create?
Technically, you can create as many branches as you want! However, best practice is to open one branch per task. A task is one bug fix, one new feature, one documentation update, one typo fix. It is not recommended to mix unrelated changes in the same branch.
2. Make your changes
It’s finally time to make your changes! Open the project in your favorite editor, such as Visual Studio Code or JupyterLab, and edit existing files or add new ones.
3. Save your work — commit
Committing means saving your changes at a specific moment in time on your computer
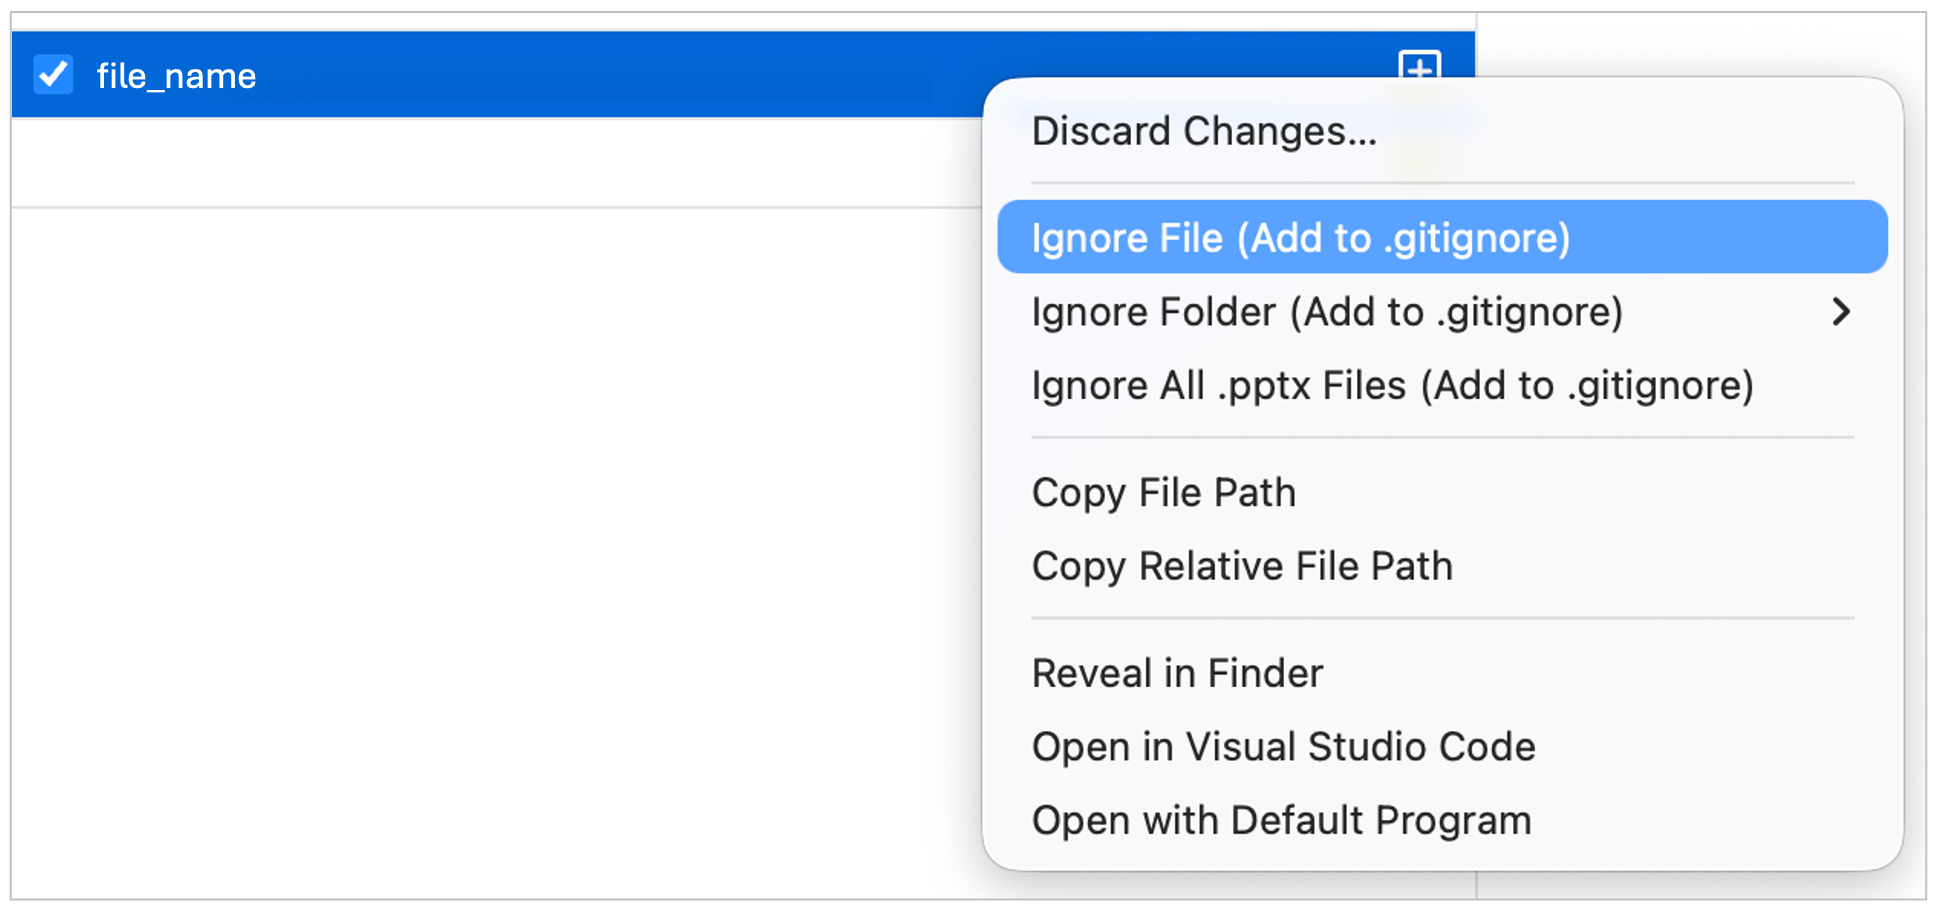
In the left panel, you will see all the files that have been modified. Review the list and decide which changes you want to include in the commit by selecting or deselecting individual files. If you want that a file will never be tracked (for example, temporary files), right-click on it and select Add to .gitignore.
Next, write a commit message. The message should briefly describe the changes you are saving, for example, Fix typo in installation guide or Add function to threshold image. Avoid vague messages such as Some changes or Fixed stuff, as they do not explain what you actually modified. By convention, commit messages start with a verb in the present (imperative) form, such as Fix, Add, Update, or Improve.
If needed, you can also add a longer description to provide additional context about the changes.
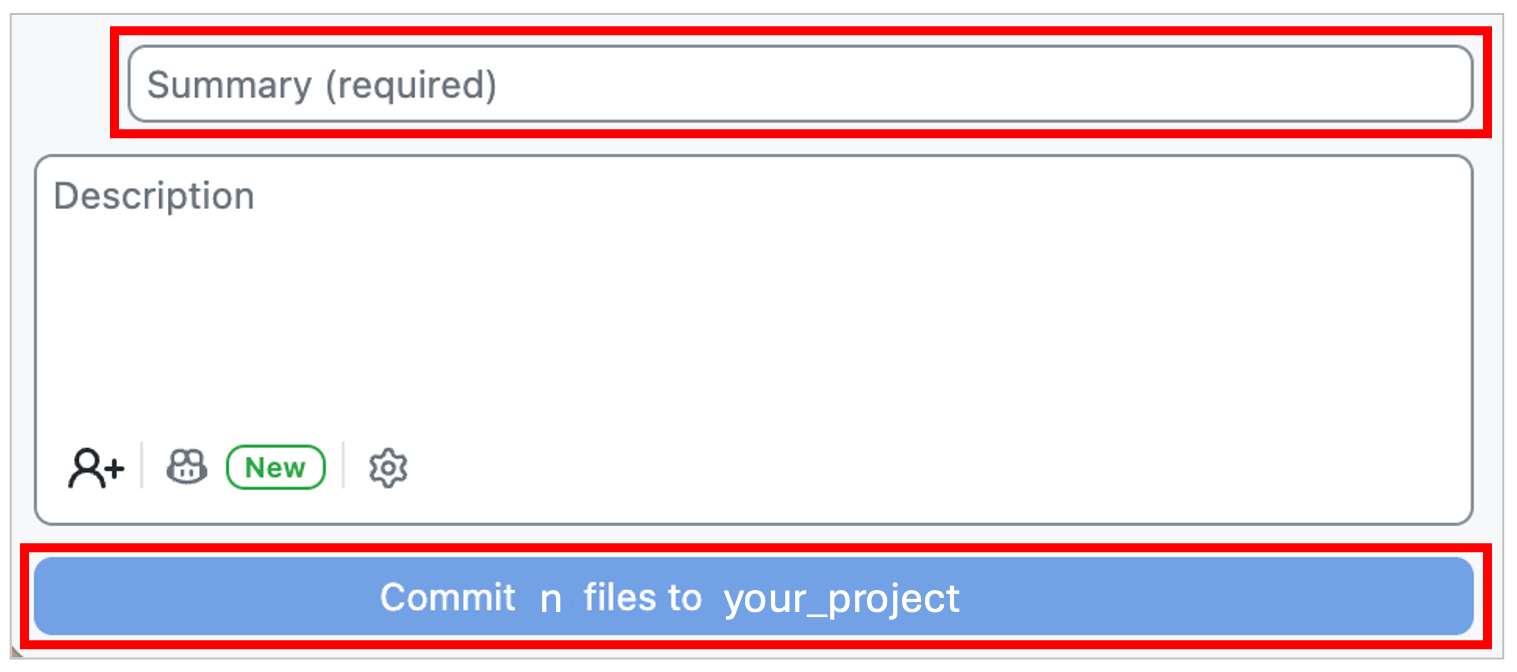
Press the button to commit your files.
# Show which files have changed (to review what will be committed)
git status

# Stage some specific files for commit
git add file1 file2 file3

# Create a commit with a descriptive message
git commit -m "describe what you changed"
where file1 file2 etc. are the files you want to commit. In alternative, you can also use git add . to commit all changes in the current directory (use with care).

How often should I commit?
Each commit should contain changes related to one logical task
Commit often. Do not wait until you finished everything! This makes it easier to review your work and undo mistakes, if necessary
4. Send it to your repository in GitHub — push to your fork
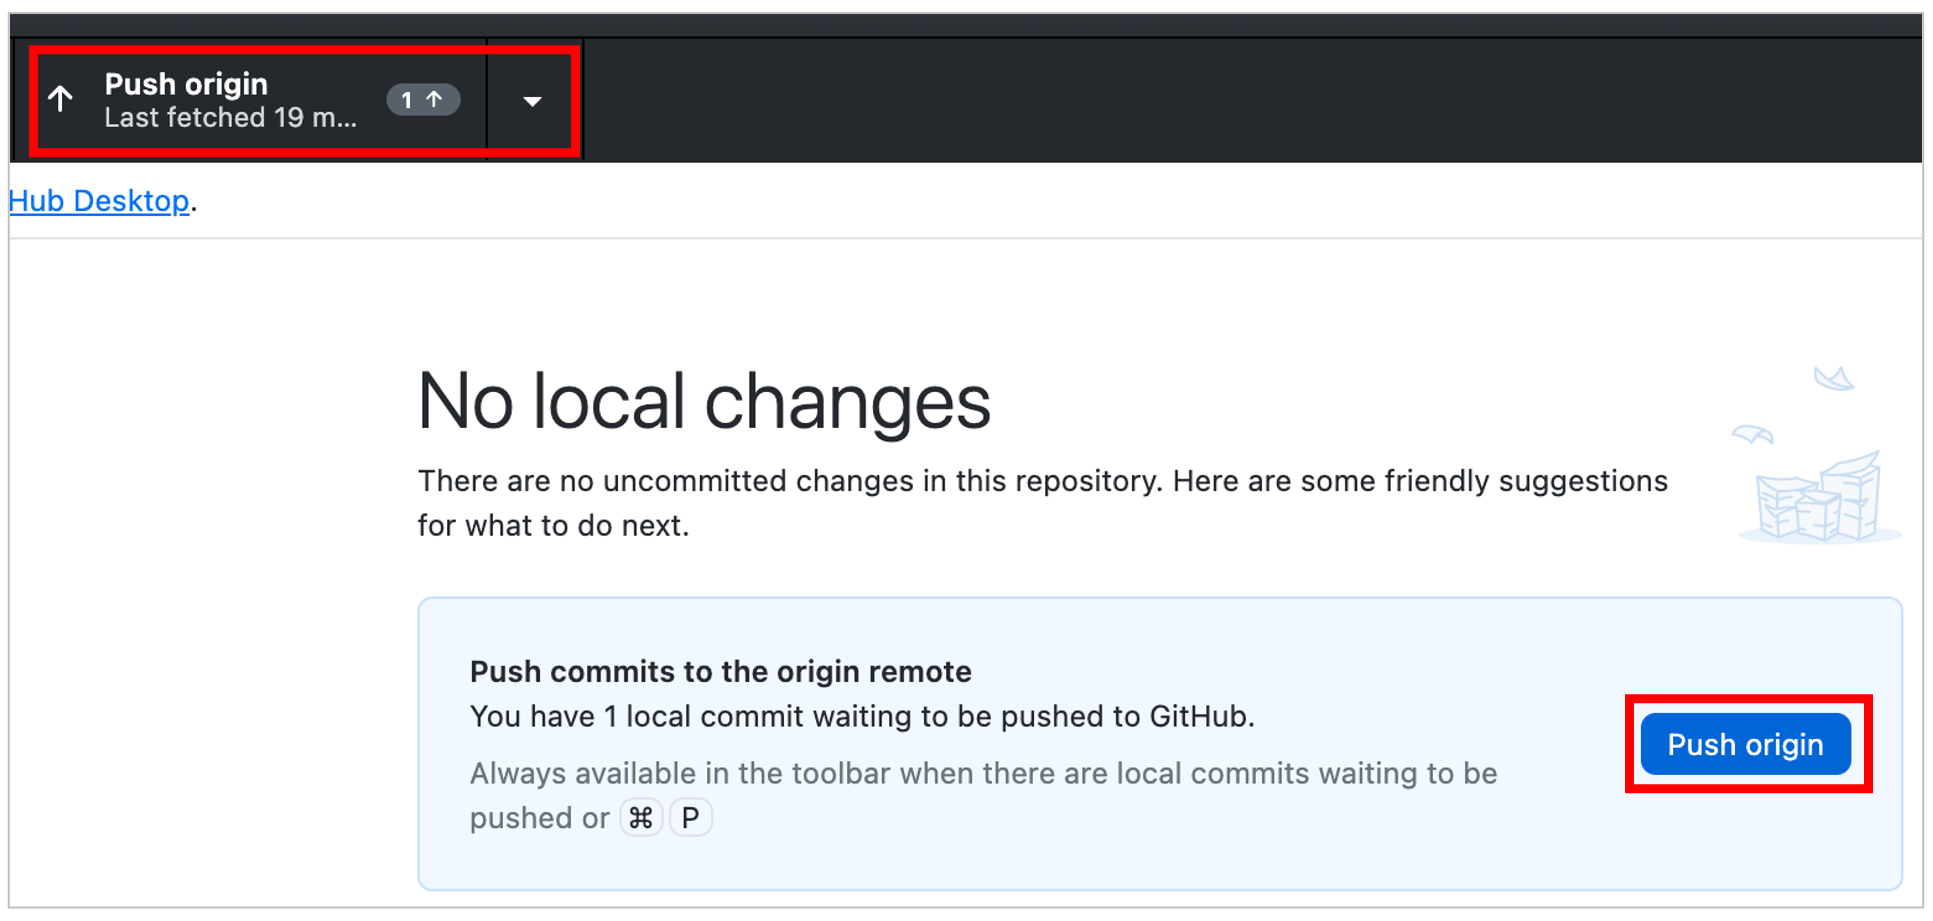
A push sends the commits you have made on your computer to the remote repository on GitHub, making them available to others
To push your commits, simply click Push origin in the top toolbar or in the central panel:
# Push the branch to your fork on GitHub (first push only)
git push -u origin my-branch-name
where my-branch-name is the name of your branch. After the first push, you can simply use git push.
5. Propose your changes — open a pull request
A pull request (PR) is how you ask the maintainers of a project to review and add your changes to the project
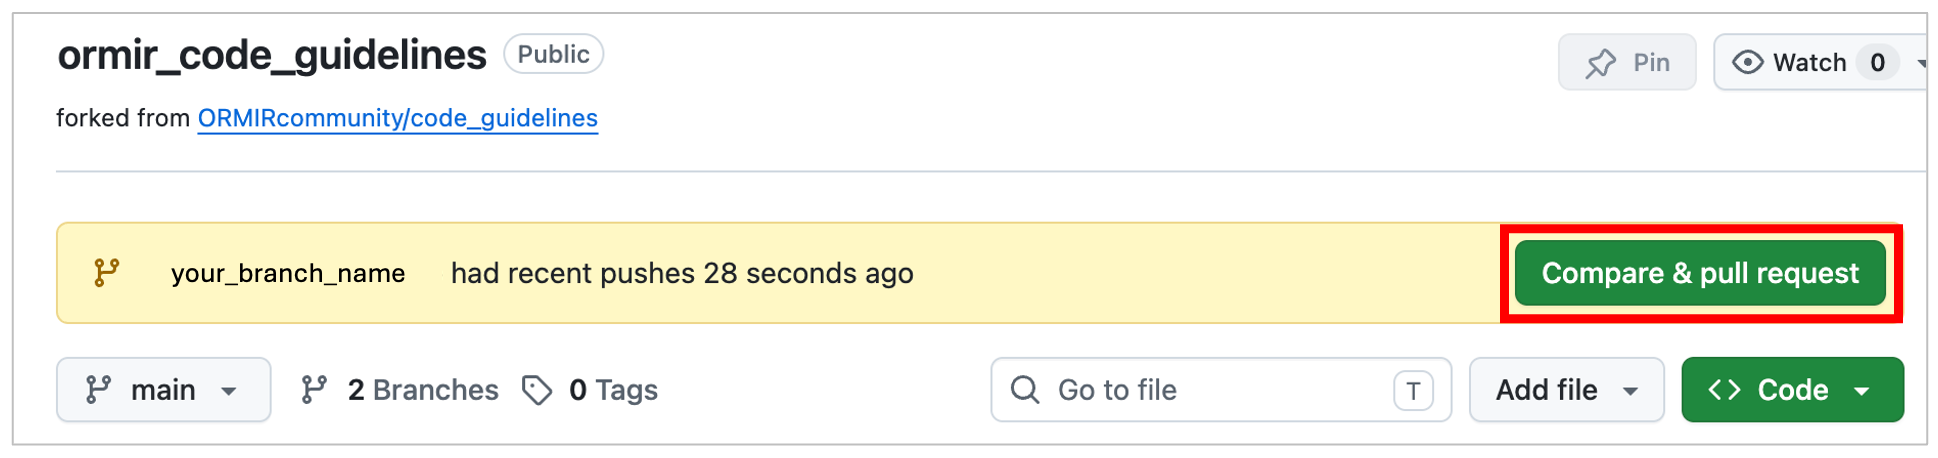
Go to your fork on GitHub.com and click Compare & pull request.
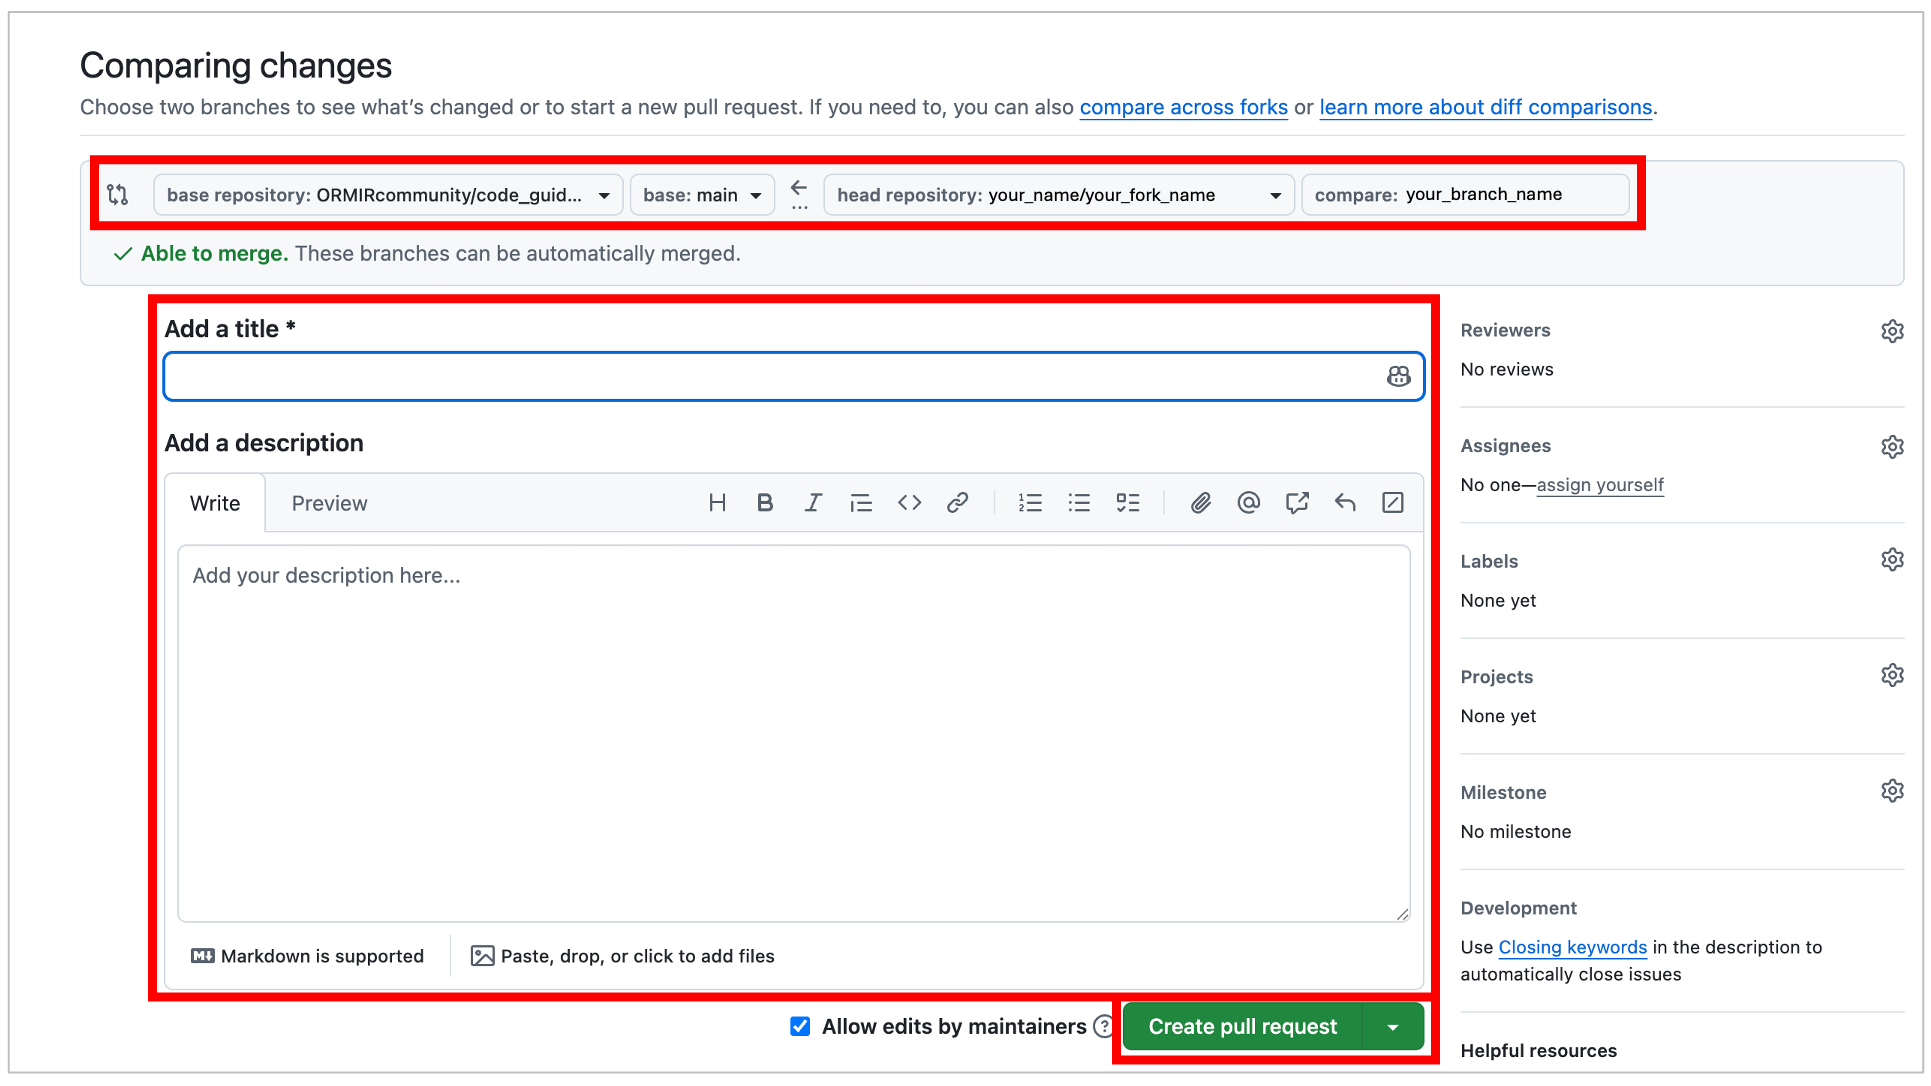
Add a title that briefly summarizes your contribution and a description explaining what you changed and why. When you are ready, click Create pull request:
What’s next?
1. Collaborate with the maintainer
The maintainers (typically the project coordinator) will receive a notification of your pull request and review your contribution. If necessary, they may ask you to provide further clarification or make additional changes. If so, simply make the requested changes in the same branch, commit them, and push them to GitHub. The pull request will update automatically. Once the review is complete, the maintainers will merge your contribution into the project.
2. Get ready your next contribution!
After your pull request has been merged, you can delete the branch to keep the project clean.
When you are ready to contribute again, remember to sync your fork with the original repository before creating a new branch. Then, simply follow the same workflow: create a new branch, make your changes, commit, push, open a pull request, and collaborate with the maintainer!
🎉 Thank you for contributing to the ORMIR community! 🎉
Your contribution helps make musculoskeletal imaging research more open, reproducible, and accessible for everyone.